线程与线程池

前言


本篇主要叙述线程的基础知识。线程的几个实现方式以及线程池的实现方式。

一、多线程实现方式

实现多线程主要是两种方式,很简单。第一种是继承Thread类,第二种是实现Runnable接口,这里仅举两个例子帮助回忆。

方式一:实现Runnable接口,重写Run方法

1
2
3
4
5
6
7
8
9
10
11
12
13
14
15
16
17
18
19
20
21
22
23
24
25
26
27
28
29
30
31
32
33
34
35
36
37
38
39
40
41
package test;

import sun.awt.windows.ThemeReader;

import java.security.PublicKey;

/**
* @Author: hqf
* @description:
* @Data: Create in 20:14 2019/1/10
* @Modified By: 实现Runnable接口
*/
public class testRunnable {
public static void main(String[] args) {
class MyRunnable1 implements Runnable{
@Override
public void run() {
System.out.println(111);
}
}

class MyRunnable2 implements Runnable{
@Override
public void run() {
try {
Thread.sleep(1000);
} catch (InterruptedException e) {
e.printStackTrace();
}
System.out.println(222);
}
}

MyRunnable1 r1 = new MyRunnable1();
MyRunnable2 r2 = new MyRunnable2();

new Thread(r2).start();
new Thread(r1).start();

}
}

方式二:继承Thread类

1
2
3
4
5
6
7
8
9
10
11
12
13
14
15
16
17
18
19
//继承Thread类

public class MaYi extends Thread {
String name;
public MaYi(String name){
this.name = name;
}
public void run(){
while(true){
try {
Thread.sleep(1000);//等待1秒
} catch (InterruptedException e) {

e.printStackTrace();
}
System.out.println(name+"蚂蚁正在下载......");
}
}
}

其实线程的实现方式还有另外两种,先占个坑,在后面补上。

但是,每次我们想要一个线程的时候,仅仅通过new Thread是不可行的,单独的线程不利于控制,在实际的项目之中大多会使用线程池。其二者的区别对比如下:

单独创建线程

a. 每次new Thread新建对象性能差。
b. 线程缺乏统一管理,可能无限制新建线程,相互之间竞争,及可能占用过多系统资源导致死机。
c. 缺乏更多功能,如定时执行、定期执行、线程中断。

线程池
a. 重用存在的线程,减少对象创建、消亡的开销,性能佳。
b. 可有效控制最大并发线程数,提高系统资源的使用率,同时避免过多资源竞争,避免堵塞。
c. 提供定时执行、定期执行、单线程、并发数控制等功能。

所以在下面引入线程池的概念。

二、线程池的实现

1.线程池的使用

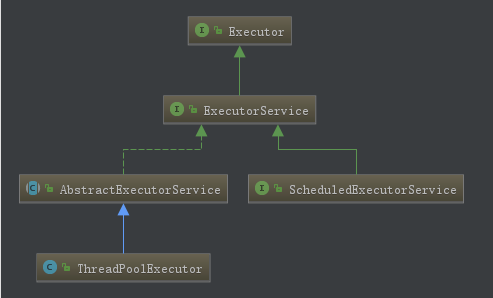
首先,先有个宏观的了解。java.util.concurrent类中的有关于线程池的类图关系是这样的

创建线程池的方式有以下五种:

1
2
3
4
5
ExecutorService exec1 = Executors.newCachedThreadPool();
ExecutorService exec2 = Executors.newFixedThreadPool(5);
ExecutorService exec4 = Executors.newSingleThreadExecutor();
ExecutorService exec3 = Executors.newScheduledThreadPool(5);
ExecutorService exec5 = Executors.newSingleThreadScheduledExecutor();

其实,启用线程池的方法也很简单。就像这样:

1
2
3
4
5
6
7
// 线程池中只存放一个线程
exec1.execute(new Runnable() {
@Override
public void run() {
// 这里写要执行的任务代码
}
});

当你想在线程池中存放多个线程的时候也可以这么干

1
2
3
4
5
6
7
8
9
10
11
12
13
14
15
16
17
18
19
20
21
22
23
24
25
26
27
28
29
30
31
32
33
34
35
36
37
38
39
40
41
42
package test;

import java.util.LinkedList;
import java.util.List;
import java.util.concurrent.ExecutorService;
import java.util.concurrent.Executors;

/**
* @Author: hqf
* @description:
* @Data: Create in 20:09 2019/5/28
* @Modified By:
*/
public class test {
public static List<taskThread> taskThreadList = new LinkedList<>();

class taskThread implements Runnable{
@Override
public void run() {
// 这里写要执行的任务代码
System.out.println("这是" + Thread.currentThread().getName() + "线程");
}
}

public void init(){
// 在线程队列中初始化5个线程
for (int i = 0 ; i < 5 ; ++i){
taskThreadList.add(new taskThread());
}
}

public static void main(String[] args) {
ExecutorService exec1 = Executors.newCachedThreadPool();
test tt = new test();
tt.init();
for (taskThread task : taskThreadList){
exec1.execute(task);
}
exec1.shutdownNow();

}
}

运行结果

1
2
3
4
5
6
7
这是pool-1-thread-2线程
这是pool-1-thread-1线程
这是pool-1-thread-4线程
这是pool-1-thread-3线程
这是pool-1-thread-5线程

Process finished with exit code 0

以上就是线程池最简单的使用方式,看着非常简单。

查看其源码实现,这五种线程池的实现无非是用了ThreadPoolExecutor和ScheduledThreadPoolExecutor两个类的构造函数来实现了,而ScheduledThreadPoolExecutor类则是实现了ScheduledExecutorService的接口以及继承自ThreadPoolExecutor,其本质还是ThreadPoolExecutor。

那么,下面就来简单的读一下这个线程池实现类的源码。

2.解析ThreadPoolExecutor类

通过继承关系的分析,其实这五个线程池的实现方法都统一调用了ThreadPoolExecutor类中同一个构造函数。

1
2
3
4
5
6
7
8
9
10
11
12
13
14
15
16
17
18
19
20
21
22
23
24
25
26
27
28
29
30
31
32
/**
* Creates a new {@code ThreadPoolExecutor} with the given initial
* parameters and default thread factory and rejected execution handler.
* It may be more convenient to use one of the {@link Executors} factory
* methods instead of this general purpose constructor.
*
* @param corePoolSize the number of threads to keep in the pool, even
* if they are idle, unless {@code allowCoreThreadTimeOut} is set
* @param maximumPoolSize the maximum number of threads to allow in the
* pool
* @param keepAliveTime when the number of threads is greater than
* the core, this is the maximum time that excess idle threads
* will wait for new tasks before terminating.
* @param unit the time unit for the {@code keepAliveTime} argument
* @param workQueue the queue to use for holding tasks before they are
* executed. This queue will hold only the {@code Runnable}
* tasks submitted by the {@code execute} method.
* @throws IllegalArgumentException if one of the following holds:<br>
* {@code corePoolSize < 0}<br>
* {@code keepAliveTime < 0}<br>
* {@code maximumPoolSize <= 0}<br>
* {@code maximumPoolSize < corePoolSize}
* @throws NullPointerException if {@code workQueue} is null
*/
public ThreadPoolExecutor(int corePoolSize,
int maximumPoolSize,
long keepAliveTime,
TimeUnit unit,
BlockingQueue<Runnable> workQueue) {
this(corePoolSize, maximumPoolSize, keepAliveTime, unit, workQueue,
Executors.defaultThreadFactory(), defaultHandler);
}

构造函数中参数含义:

corePoolSize:线程池中一直存在的线程数量,线程会一直存活,即使当前处于空闲状态。另外当线程数小于核心线程数时,即使现有的线程空闲,线程池也会优先创建新线程来处理任务,而不是直接交给现有的线程处理。

maximumPoolSize:线程池中允许存在的最大线程数。

keepAliveTime:线程的最长等待时间。当前线程池中的空闲线程等待新任务到来的最长时间,若在该时间内该线程还未被调用,则销毁,直到线程数量等于corePoolSize。如果allowCoreThreadTimeout设置为true,则所有线程均会退出直到线程数量为0。

unit:时间单位。

workQueue:任务队列容量。

这边的几个参数理解起来还是很抽象的,这里就举一个简单例子来说明:一个线程池就像是一个加工厂,其中核心线程池数量(corePoolSize)就像是工厂的工人,比如说corePoolSize为10,相当于加工厂中有10个工人,并且每个工人只能同时做一个任务。当有任务来的时候,分配给工人完成。当任务量很少的时候,可能会有空闲着的工人,也就是会有空闲的核心线程,但是核心线程会一直存活且保持10的数量。当工厂接受任务的数量大于10的时候,这时候就需要排队等待了,也就是这边的进入任务队列。但是当来任务的速度大大超过工人完成任务的速度时,就需要进行一些补救的措施,也就是重新招临时工,比如重新招收了5个临时工,现在就有15个工人在工作,相当于线程池最大的线程数 maximumPoolSize。如果任务量超过了线程池最大线程数,这时候就不再接受任务或者抛弃掉之前的任务。当任务数量少于任务队列的容量时,临时工就没有必要再存在了。

还有另外两个参数,相对不重要一些,这个构造函数中用的是两个默认的参数

  1. threadFactory :executor 创建新线程的时候会用到。
  2. handler :饱和策略。关于饱和策略下面单独介绍一下。

定义:如果当前线程池中同时运行的线程数量达到了最大线程数量并且队列也已经放满了,这时候ThreadPoolExecutor就制定了一些策略。

  • ThreadPoolExecutor.AbortPolicy:抛出 RejectedExecutionException来拒绝新任务的处理。
  • ThreadPoolExecutor.CallerRunsPolicy:调用执行自己的线程运行任务。您不会任务请求。但是这种策略会降低对于新任务提交速度,影响程序的整体性能。另外,这个策略喜欢增加队列容量。如果您的应用程序可以承受此延迟并且你不能任务丢弃任何一个任务请求的话,你可以选择这个策略。
  • ThreadPoolExecutor.DiscardPolicy 不处理新任务,直接丢弃掉。
  • ThreadPoolExecutor.DiscardOldestPolicy 此策略将丢弃最早的未处理的任务请求。

注意:源码中AbortPolicy是直接抛出RejectedExecutionExpection异常,而在DiscardPolicy中是啥都不干,也就是rejectedExecution方法是一个空方法。


为了启动线程池中的任务,需要调用Execute这个方法。一般写代码的时候我们会这样使用。

1
2
3
4
5
6
7
ExecutorService exec1 = Executors.newCachedThreadPool();
exec1.execute(new Runnable() {
@Override
public void run() {
// 这里写要执行的任务代码
}
});

实际上,线程池不允许使用 Executors 去创建,而是通过 ThreadPoolExecutor 的方式,这样的处理方式让写的同学更加明确线程池的运行规则,规避资源耗尽的风险。如果用Executors返回线程池对象可能会产生一些问题

FixedThreadPoolSingleThreadPool: 允许的请求队列长度为 Integer.MAX_VALUE,可能会堆积大量的请求,从而导致 OOM

CachedThreadPool: 允许的创建线程数量为 Integer.MAX_VALUE,可能会创建大量的线程,从而导致 OOM

三、源码分析

先给出线程池的核心调用链路

线程池核心调用链路

除了ThreadPoolExecutor类的构造方法中提到的那些参数,一个比较重要的参数是ctlctl代表当前线程池状态和线程池线程数量的结合体,高3位标识当前线程池运行状态,后29位标识线程数量。

线程池的运行状态有以下几种

RUNNING:(1) 状态说明:线程池处在RUNNING状态时,能够接收新任务,以及对已添加的任务进行处理。 (2) 状态切换:线程池的初始化状态是RUNNING。换句话说,线程池被一旦被创建,就处于RUNNING状态,并且线程池中的任务数为0。

SHUTDOWN:(1)状态说明:线程池处在SHUTDOWN状态时,不接收新任务,但能处理已添加的任务。 (2) 状态切换:调用线程池的shutdown()接口时,线程池由RUNNING -> SHUTDOWN

STOP:(1)状态说明:线程池处在STOP状态时,不接收新任务,不处理已添加的任务,并且会中断正在处理的任务。 (2) 状态切换:调用线程池的shutdownNow()接口时,线程池由(RUNNING or SHUTDOWN ) -> STOP

TIDYING:(1) 状态说明:当所有的任务已终止,ctl记录的”任务数量”为0,线程池会变为TIDYING状态。当线程池变为TIDYING状态时,会执行钩子函数terminated()。terminated()在ThreadPoolExecutor类中是空的,若用户想在线程池变为TIDYING时,进行相应的处理;可以通过重载terminated()函数来实现。 (2) 状态切换:当线程池在SHUTDOWN状态下,阻塞队列为空并且线程池中执行的任务也为空时,就会由 SHUTDOWN -> TIDYING。 当线程池在STOP状态下,线程池中执行的任务为空时,就会由STOP -> TIDYING

TERMINATED:(1) 状态说明:线程池彻底终止,就变成TERMINATED状态。 (2) 状态切换:线程池处在TIDYING状态时,执行完terminated()之后,就会由 TIDYING -> TERMINATED

1
2
3
4
5
6
7
8
9
10
11
12
13
14
15
16
17
18
19
20
21
22
23
24
25
26
27
28
29
30
31
32
33
34
35
36
37
38
39
40
41
42
43
44
45
46
47
48
49
50
51
52
53
54
55
56
57
58
59
60
61
62
/**
* Executes the given task sometime in the future. The task
* may execute in a new thread or in an existing pooled thread.
*
* If the task cannot be submitted for execution, either because this
* executor has been shutdown or because its capacity has been reached,
* the task is handled by the current {@code RejectedExecutionHandler}.
*
* @param command the task to execute
* @throws RejectedExecutionException at discretion of
* {@code RejectedExecutionHandler}, if the task
* cannot be accepted for execution
* @throws NullPointerException if {@code command} is null
*/
public void execute(Runnable command) {
// 当接受参数为null的时候,抛出NullPointerException异常
if (command == null)
throw new NullPointerException();
/*
* Proceed in 3 steps:
*
* 1. If fewer than corePoolSize threads are running, try to
* start a new thread with the given command as its first
* task. The call to addWorker atomically checks runState and
* workerCount, and so prevents false alarms that would add
* threads when it shouldn't, by returning false.
*
* 2. If a task can be successfully queued, then we still need
* to double-check whether we should have added a thread
* (because existing ones died since last checking) or that
* the pool shut down since entry into this method. So we
* recheck state and if necessary roll back the enqueuing if
* stopped, or start a new thread if there are none.
*
* 3. If we cannot queue task, then we try to add a new
* thread. If it fails, we know we are shut down or saturated
* and so reject the task.
*/
// c是一个32位的整型,其中用高3位来表示线程池的状态,用低5位来表示线程池的线程数量
int c = ctl.get();
// 当工作线程数量小于核心线程池线程数量的时候,添加入一个任务,并把当前的command作为第一个任务。下面我会详细解释addWorker(command, true)这个函数
if (workerCountOf(c) < corePoolSize) {
if (addWorker(command, true))
return;
// 若添加失败,考虑到是多线程,重新获取一次ctl。
c = ctl.get();
}
// 如果线程池处于RUNNING状态,则加入到workQueue队列中,
if (isRunning(c) && workQueue.offer(command)) {
// 重新获取一次ctl
int recheck = ctl.get();
//若线程池不处于RUNNING状态,则移除掉这个任务,执行reject(command);
if (! isRunning(recheck) && remove(command))
reject(command);
// 否则添加入队列中
else if (workerCountOf(recheck) == 0)
addWorker(null, false);
}
// 若添加任务失败,则执行reject(command);
else if (!addWorker(command, false))
reject(command);
}

首先,传进来的参数是一个Runnable对象,也就是要启动的那个线程。

分支一:若当前线程数量小于核心线程数的时候,则执行添加线程的操作addWorker()。当添加失败的时候,重新获取一下ctl。这边添加失败主要考虑两种情况:一种为多线程并发的时候,线程A B C同时执行,此时A可能已经添加完成了,当前线程数可能就不小于核心线程数,此时会添加失败。第二种为多线程并发的时候,其他线程对线程池的状态进行了转变,例如线程A执行addWorker()方法时,线程B修改线程池状态,导致线程池不是RUNNING状态,此时线程A执行addWorker()就有可能失败。

1
2
3
4
5
if (workerCountOf(c) < corePoolSize) {
if (addWorker(command, true))
return;
c = ctl.get();
}

分支二:当分支一中工作线程的数量大于等于核心线程的数量或者添加线程失败的时候,会进到这个分支中。

分支三:通过分支一和分之二的分析,进入这个分支的前置条件:线程数超过核心线程数且workQueue中数据已满。

上面在执行execute()这个方法的时候,多次用到了addWorker()方法,在此之前先来说说Worker类

WorkerThreadPoolExecutor中的内部类,继承自AQS且实现了Runnable接口。 类中包含Thread thread,它是worker内部封装的工作线程,还有firstTask属性,它是一个可执行的Runnable对象。在Worker的构造函数中,使用线程工厂创建了一个线程,当thread启动的时候,会以worker.run()为入口启动线程,这里会直接调用到runWorker()中。

下面再详细说一下addWorker()这个方法,其源码实现是这样的。

1
2
3
4
5
6
7
8
9
10
11
12
13
14
15
16
17
18
19
20
21
22
23
24
25
26
27
28
29
30
31
32
33
34
35
36
37
38
39
40
41
42
43
44
45
46
47
48
49
50
51
52
53
54
55
56
57
58
59
60
61
62
63
64
65
66
67
68
69
70
71
72
73
74
75
76
private boolean addWorker(Runnable firstTask, boolean core) {
retry:
for (;;) {
// 获取其ctl
int c = ctl.get();
// rs表示当前线程池的执行状态
int rs = runStateOf(c);

// 若当前线程池的状态大于等于SHUTDOWN,也就是处于SHUTDOWN、STOP、TIDYING、TERMINATED状 态的时候,且满足rs!=SHUTDOWN 或 firstTask != null 或 workQueue.isEmpty()三种情况其中 一种情况时,则添加失败。
// Check if queue empty only if necessary.
if (rs >= SHUTDOWN &&
! (rs == SHUTDOWN &&
firstTask == null &&
! workQueue.isEmpty()))
return false;

for (;;) {
int wc = workerCountOf(c);
// 如果线程池中线程数量超过界限的话,则返回false
if (wc >= CAPACITY ||
wc >= (core ? corePoolSize : maximumPoolSize))
return false;
// 用cas对工作线程的数量进行修改。
if (compareAndIncrementWorkerCount(c))
break retry;
// 重新获取一次ctl,若当前线程池状态发生改变,则重新返回retry重新判断。这边是为了考虑可 能会有其他线程对当前线程池的状态发生改变的情况发生。
c = ctl.get(); // Re-read ctl
if (runStateOf(c) != rs)
continue retry;
// else CAS failed due to workerCount change; retry inner loop
}
}

// 下半段
boolean workerStarted = false;
boolean workerAdded = false;
Worker w = null;
try {
w = new Worker(firstTask);
// 重新new出一个线程,将其添加入工作队列中
final Thread t = w.thread;
if (t != null) {
// 加锁,防止其他线程的破坏,在此期间不会有其他线程影响到线程池的状态。
final ReentrantLock mainLock = this.mainLock;
mainLock.lock();
try {
// Recheck while holding lock.
// Back out on ThreadFactory failure or if
// shut down before lock acquired.
int rs = runStateOf(ctl.get());

if (rs < SHUTDOWN ||
(rs == SHUTDOWN && firstTask == null)) {
if (t.isAlive()) // precheck that t is startable
throw new IllegalThreadStateException();
// 这个workers是一个HashSet<worker>变量
workers.add(w);
int s = workers.size();
if (s > largestPoolSize)
largestPoolSize = s;
workerAdded = true;
}
} finally {
mainLock.unlock();
}
if (workerAdded) {
t.start();
workerStarted = true;
}
}
} finally {
if (! workerStarted)
addWorkerFailed(w);
}
return workerStarted;
}

这边几个值得关注的地方,首先addWorker()方法的上半段主要是对线程池的状态以及线程数量进行判断,若不满足条件则返回添加线程失败的错误,若没有这些异常问题,就考虑在并发的情况下用CAS修改当前线程池的状态。下半段主要是创建线程(worker),并添加到池子中。并调用t.start()启动线程。

在调用了这个t.start()之后就会去执行Worker类中重写的那个run()方法,也就是执行里面的runWorker(this)

1
2
3
public void run() {
runWorker(this);
}
1
2
3
4
5
6
7
8
9
10
11
12
13
14
15
16
17
18
19
20
21
22
23
24
25
26
27
28
29
30
31
32
33
34
35
36
37
38
39
40
41
42
43
44
45
final void runWorker(Worker w) {
Thread wt = Thread.currentThread();
Runnable task = w.firstTask;
w.firstTask = null;
w.unlock(); // allow interrupts
boolean completedAbruptly = true;
try {
// 如果task是一个空任务或者workQueue中获取到的任务为空,则退出循环。
while (task != null || (task = getTask()) != null) {
w.lock();
// If pool is stopping, ensure thread is interrupted;
// if not, ensure thread is not interrupted. This
// requires a recheck in second case to deal with
// shutdownNow race while clearing interrupt
if ((runStateAtLeast(ctl.get(), STOP) ||
(Thread.interrupted() &&
runStateAtLeast(ctl.get(), STOP))) &&
!wt.isInterrupted())
wt.interrupt();
try {
beforeExecute(wt, task);
Throwable thrown = null;
try {
task.run();
} catch (RuntimeException x) {
thrown = x; throw x;
} catch (Error x) {
thrown = x; throw x;
} catch (Throwable x) {
thrown = x; throw new Error(x);
} finally {
afterExecute(task, thrown);
}
} finally {
task = null;
w.completedTasks++;
w.unlock();
}
}
completedAbruptly = false;
} finally {
// 执行清理工作
processWorkerExit(w, completedAbruptly);
}
}

最核心的就是调用task.run()启动当前任务,这里面还有两个可扩展的方法,分别是beforeExecute()/afterExecute(),我们可以在任务执行前和执行后分别自定义一些操作,其中afterExecute()可以接收到任务抛出的异常信息,方便我们做后续处理。

注意下面的这个while循环是为了线程的复用,也就是每一个worker线程不仅仅是处理了自己的firstTask,还要判断队列中是否还有其他的任务,也要一并进行处理,且复用的是同一个Thread,做到了线程的复用。

1
while (task != null || (task = getTask()) != null)

再看看具体里面的方法getTask()

1
2
3
4
5
6
7
8
9
10
11
12
13
14
15
16
17
18
19
20
21
22
23
24
25
26
27
28
29
30
31
32
33
34
35
36
37
private Runnable getTask() {
boolean timedOut = false; // Did the last poll() time out?

for (;;) {
int c = ctl.get();
int rs = runStateOf(c);

// Check if queue empty only if necessary.
if (rs >= SHUTDOWN && (rs >= STOP || workQueue.isEmpty())) {
decrementWorkerCount();
return null;
}

int wc = workerCountOf(c);

// Are workers subject to culling?
boolean timed = allowCoreThreadTimeOut || wc > corePoolSize;

if ((wc > maximumPoolSize || (timed && timedOut))
&& (wc > 1 || workQueue.isEmpty())) {
if (compareAndDecrementWorkerCount(c))
return null;
continue;
}

try {
Runnable r = timed ?
workQueue.poll(keepAliveTime, TimeUnit.NANOSECONDS) :
workQueue.take();
if (r != null)
return r;
timedOut = true;
} catch (InterruptedException retry) {
timedOut = false;
}
}
}

getTask方法用于从阻塞队列中获取任务,如果当前线程小于核心线程,那么当阻塞队列中没有任务时就会阻塞,反之会等待keepAliveTime后返回。若核心线程设置了allowCoreThreadTimeOut=true也会回收核心线程。

E poll(): 队列非空,移除数据,并返回该数据的值;队列为空,返回null。

E take(): 队列非空,移除数据,并返回该数据的值;队列为空,阻塞调用此方法线程,直到队列为非空时此线程进入就绪状态。

主要看下以下两句代码

1
2
boolean timed = allowCoreThreadTimeOut || wc > corePoolSize;
Runnable r = timed ?workQueue.poll(keepAliveTime, TimeUnit.NANOSECONDS) :workQueue.take();

timed为true的条件就是核心线程没有设置过期并且当前线程数量小于等于核心线程数,这时候就会执行三目运算符的workQueue.take(),就会阻塞在这里,一直等到阻塞队列中重新提交了任务,这样也保证了核心线程永远不过期。再看看和上述情况相反的情况,这时候会调用workQueue.poll,如果阻塞队列中还有任务,那就直接拿出来,并返回r即可,如果阻塞队列中没有任务了,就会等待keepAliveTime的时间后返回,如果返回为空,则可以认为阻塞队列中没有任务了,当前线程数量就会被减1(这也是keepAliveTime的用处)真正的销毁在下面的这个processWorkerExit()函数中。

接着看runWorker()中的processWorkerExit(),清理当前线程。

1
2
3
4
5
6
7
8
9
10
11
12
13
14
15
16
17
18
19
20
21
22
23
24
25
26
27
28
29
30
private void processWorkerExit(Worker w, boolean completedAbruptly) {
if (completedAbruptly) // If abrupt, then workerCount wasn't adjusted
decrementWorkerCount();

final ReentrantLock mainLock = this.mainLock;
mainLock.lock();
try {
completedTaskCount += w.completedTasks;
workers.remove(w);
} finally {
mainLock.unlock();
}
// 尝试关闭线程池
tryTerminate();

int c = ctl.get();
// 当前线程池状态小于STOP,即当前线程池状态当前线程池状态为 RUNNING 或 SHUTDOWN,判断当前线程是否是正常退出。
if (runStateLessThan(c, STOP)) {
// 正常退出
if (!completedAbruptly) {
int min = allowCoreThreadTimeOut ? 0 : corePoolSize;
if (min == 0 && ! workQueue.isEmpty())
min = 1;
if (workerCountOf(c) >= min)
return; // replacement not needed
}
// 异常退出可能导致线程池中线程数量不足,此时就要执行addWorker()为线程池添加新的worker数据
addWorker(null, false);
}
}

见注释

1
2
3
4
5
6
7
8
9
10
11
12
13
14
15
16
17
18
19
20
21
22
23
24
25
26
27
28
29
30
31
32
// 只对下述两种方法打上中断标记(SHUTDOWN and pool and queue empty) or (STOP and pool empty)
final void tryTerminate() {
for (;;) {
int c = ctl.get();
if (isRunning(c) ||
runStateAtLeast(c, TIDYING) ||
(runStateOf(c) == SHUTDOWN && ! workQueue.isEmpty()))
return;
if (workerCountOf(c) != 0) { // Eligible to terminate
// 给空线程打上中断标记
interruptIdleWorkers(ONLY_ONE);
return;
}

final ReentrantLock mainLock = this.mainLock;
mainLock.lock();
try {
if (ctl.compareAndSet(c, ctlOf(TIDYING, 0))) {
try {
terminated();
} finally {
ctl.set(ctlOf(TERMINATED, 0));
termination.signalAll();
}
return;
}
} finally {
mainLock.unlock();
}
// else retry on failed CAS
}
}

3.其他常用方法

线程池还有一些常用的方法,比如说

1
2
shutdown() 终止线程池任务的添加,执行完当前已经有的任务以及任务队列中的任务即停止线程池。
shutdownNow() 终止线程池,并尝试暂停所有正在执行的任务,销毁任务队列中的所有等待线程。

参考:https://juejin.im/post/5ec9b64de51d45786973b8fa